
Backup Recovery/Restore in the cPanel UI
If your cPanel accounts with the enabled Acronis Backup privilege can browse backups in their cPanel interface and download or recover files, folders, databases, mailboxes, mail filters, mail forwarders, and entire account.
➥Downloading files
- Click Acronis Backup.
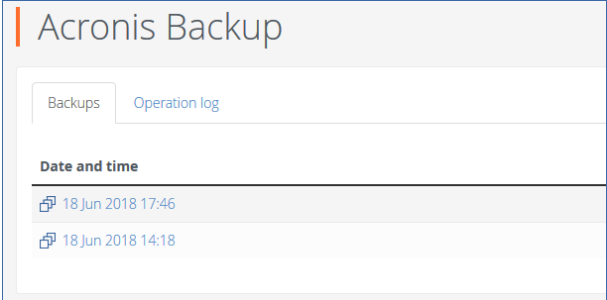
- Open the Backups tab.

- Select a recovery point.
- After you select the recovery point, the corresponding backup is mounted to the cPanel server. The process may take up to a few minutes.

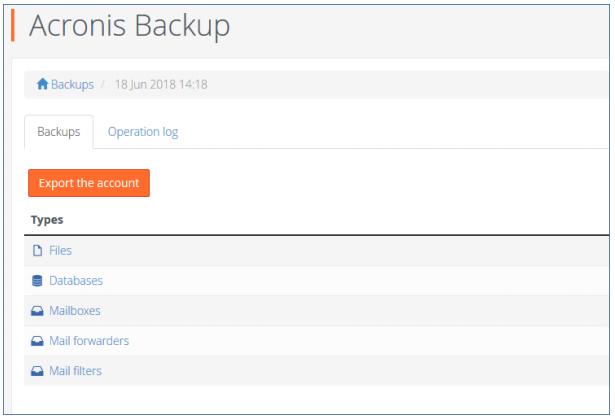
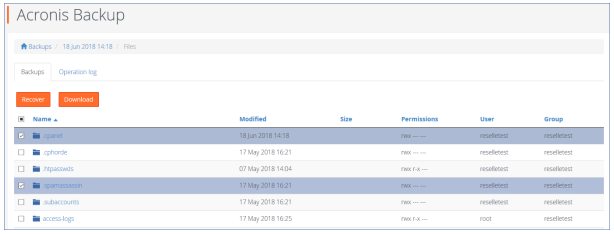
- Click Files.
- Select the files and folders to download.

- Click Download.
If you choose to download a single file, the download will start immediately. If you request to download several files, a .zip archive will be prepared and placed into your home folder. Once the archive is ready, download it by using the link in the notification bar or in the Operation Log, or by using the File Manager.
➥ Recovering files to the original location
- Click Acronis Backup.
- Open the Backups tab.
- Select a recovery point.
After you select the recovery point, the corresponding backup is mounted to the cPanel server.The process may take up to a few minutes. - Click Files.
- Select the files and folders to recover.
- Click Recover.
- If at least one folder is selected, you can select the Delete any files in the original location that were created after the backup option. If this option is enabled, all files from selected folders will be deleted before the recovery.This option may be useful if your website were hacked, to ensure that all malicious files are deleted.
- Click Recover.
As a result, the selected files on the cPanel server are replaced with their copies from the backup.
➥Downloading database dumps
- Click Acronis Backup.
- Open the Backups tab.
- Select a recovery point.
- Click Databases.
- Select the databases to download.
- Click Download.
- As result, a .zip archive with SQL dumps is prepared and placed into your home folder.
➥Recovering databases to the original location
- Click Acronis Backup.
- Open the Backups tab.
- Select a recovery point.
- Click Databases.
- Select databases to recover.
- Click Recover.
- Make sure that the Add suffix to the recovered database name check box is cleared.
- Click Recover.
As a result, the selected databases are recovered to the original location. The existing databases are overwritten. If a database no longer exists, it is recreated automatically.
➥Recovering databases as new ones
- Click Acronis Backup.
- Open the Backups tab.
- Select a recovery point.
- Click Databases.
- Select databases to recover.
- Click Recover.
- Select the Add suffix to the recovered database name check box.
- Click Recover.
As a result, new databases with the “%original_name%%suffix%” name is created in cPanel. The
existing databases are not affected.
➥Downloading mailboxes
- Click Acronis Backup.
- Open the Backups tab.
- Select a recovery point.
- Click Mailboxes.
- Select the mailboxes to download.
- Click Download.
As a result, a .zip archive with the mailboxes content will be prepared and placed into your home
folder.
➥Recovering mailboxes to the original location
- Click Acronis Backup.
- Open the Backups tab.
- Select a recovery point.
- Click Mailboxes.
- Select the mailboxes to recover.
- Click Recover and confirm.
As a result, the selected mailboxes are recovered to the original location. If the selected mailbox no
longer exists on the server, it is recreated automatically.
➥Downloading mail filters
- Click Acronis Backup.
- Open the Backups tab.
- Select a recovery point.
- Click Mail filters.
- Select the mail filters to download.
- Click Download.
➥Recovering mail filters to the original location
- Click Acronis Backup.
- Open the Backups tab.
- Select a recovery point.
- Click Mail filters.
- Select the mail filters to recover.
- Click Recover and confirm.
➥Downloading mail forwarders
- Click Acronis Backup.
- Open the Backups tab.
- Select a recovery point.
- Click Mail forwarders.
- Select the mail forwarders to download.
- Click Download.
➥Recovering mail forwarders to the original location
- Click Acronis Backup.
- Open the Backups tab.
- Select a recovery point.
- Click Mail forwarders.
- Select the mail forwarders to recover.
- Click Recover and confirm.
➥Exporting the entire account
- Click Acronis Backup.
- Open the Backups tab.
- Select a recovery point.
- Click Export the account.
- [Optional] Select Skip export of databases and Skip export of home directory check boxes.
- Check the results in the Operation log tab. If the account was exported successfully, you can download the archive.